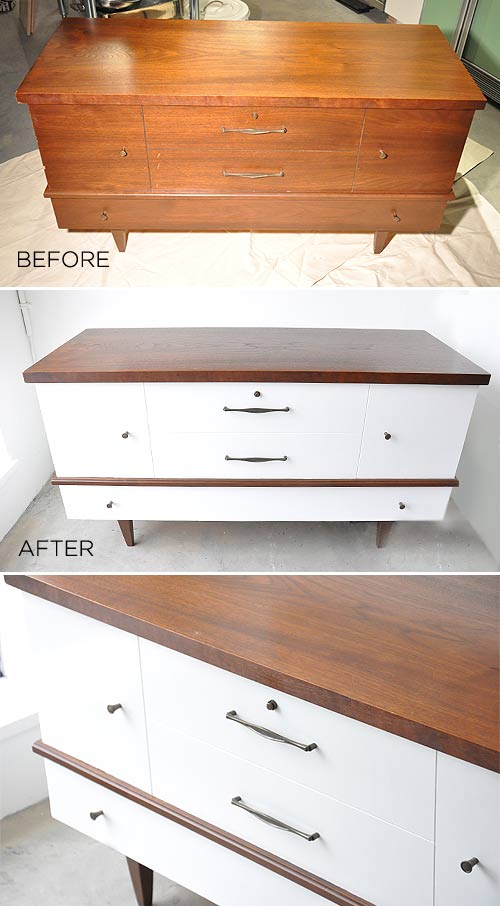
Another weekend brings another project.
This weekend we found a 50’s style trunk. It really needed some love, specifically on the front, there were some deep scratches, but the top was in great shape. We decided we liked the colour of the “wood” so we left the top as is and kept the legs and the detail around the middle. The rest needed to be brightened up to make it a little more modern.
This piece is pretty unique, the top lifts up like a trunk, and the bottom is a functioning drawer. The cupboards and smaller drawers are fake.


Hello. I love how you painted your trunk. Do you mind sharing your paint color for the white, anything you used on the wood and how you got the white to look so smooth (ie. brush vs. spray). Thanks!
hi Amy,
I actually don’t recall the paint colour as I don’t have the can anymore. It was Benjamin Moore brand oil paint. Oil paint sticks to wood better and leaves a smoother finish even if you use a brush. I lightly sanded the wood, as it’s not a solid wood piece, it’s just veneer, I didn’t want to damage it. I sanded it enough to create some texture for the paint to fuse with and to remove the varnish layer. After sanding, I wiped it with a damp cloth and waited for it to dry. I did the first coat lightly with a brush and a mini roller. With oil paint you have to wait for each coat to dry overnight. So patience is key. I did 3 thin coats in total, using a brush and a mini roller.
I hope this helps!
Love it, you have a great eye!
Thanks so much 🙂